Subscribe
Home > Subscribe
Subscribe to the SYC Calendar
Active SYC members may find it handy the have access to the latest club activities at their fingertips by subscribing to the SYC Calendar on their mobile device. Below are the steps to add our calendar to a couple of the more popular devices.
The SYC Calendar iCAL URL:
https://calendar.google.com/calendar/u/0?cid=c3ljeWFjaHRjbHViMjAyMkBnbWFpbC5jb20
Subscribe to the SYC Calendar to your Apple Device
1. Click your iPhone Settings icon.
2. Select Mail, Contacts, Calendars from the list.
3. Select Add Account.
4. Select Other.
5. Select Add Subscribed Calendar at the bottom of the list.
6. Enter the subscription link (shown above) in the server field.
7. Click Next in the top right hand corner of the screen.
8. The URL will be verified, and your subscription information will display.
9. Click Save.
To view this calendar on your iPhone:
1. Click the Calendar icon on your iPhone’s home screen.
2. Click the Calendars button in the top left hand corner of your default calendar screen.
3. Select the name of the calendar you have just added. A check mark will appear next to it.
4. Click Done.
Subscribe to the SYC Calendar to your Android Device
Subscribing to a Google calendar on Android is actually a two-step process. You must first subscribe to the calendar using the web version of Google Calendar and then add it to your Android device.
Subscribing to ical on Google Calendar web:
Step 1: Go to the Google Calendar account linked to your Android device.
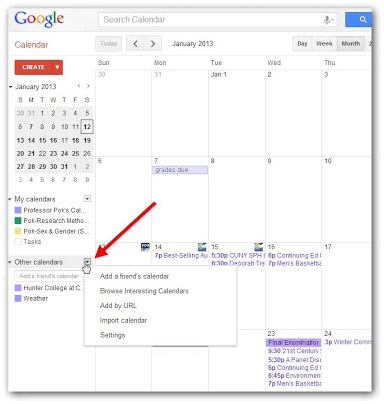
Step 2: Choose “Other calendars”

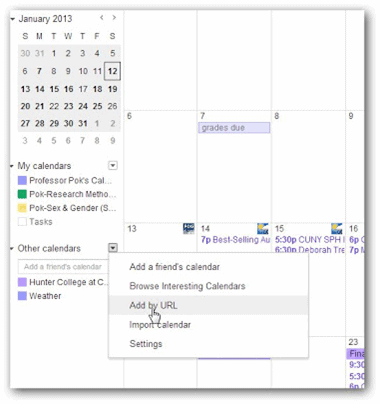
Step 3: In the dropdown menu, choose “Add by URL”

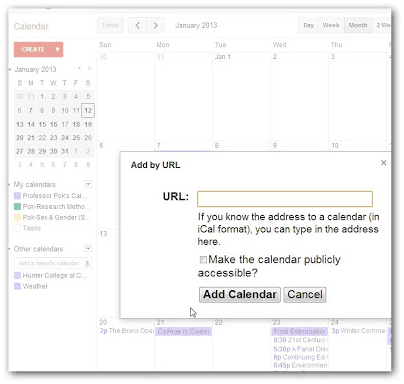
Step 4: Insert our calendar’s ical address

SYC Calendar iCAL URL:(Cut & Paste)
https://calendar.google.com/calendar/u/0?cid=c3ljeWFjaHRjbHViMjAyMkBnbWFpbC5jb20
into the URL box and click “Add Calendar.” Now you should be able to see our calendar in your Google calendar.
Adding subscribed calendars to your Android device:
Step 1: On your Android device, you may have to clear the existing calendars and re-sync the data for a new calendar to show up.
• Settings / Applications / Manage Applications / Calendar -> Clear Data
• then Settings / Applications / Manage Applications / Calendar Storage -> Clear Data
Wait a few minutes and you should be able to see the new calendar. If the new calendar does not show up, also do the following:
• Settings / Accounts & sync -> select your account, uncheck the “Sync Calendar” option
• Wait a few minutes and re-check the Sync Calendar option to see
Keep in mind that if you have 2-step verification enabled on your phone, you may have to remove the account entirely and re-add it.
